Hello Skeletonic
Getting started with the Skeletonic Stylus Library is almost effortless.
This guide will take you step by step through creating a simple web page, building it, and running it locally on a web server.
Prerequisites
Download and install Node.js
Note
The prerequisites listed below are the minimum requirements for completing this first app demo.
If you haven’t installed Node yet, download the latest stable release of Node.js.
Set Up Your First Website
Create Your Site
The first step is to create a new folder for your project and change into the newly created folder. Open up your terminal and enter the following:
mkdir hello && cd hello
Once the command finishes, let’s initialize our package.json file:
npm init
Now let’s install skeletonic-stylus and list skeletonic-stylus as a dev dependency in our package.json
npm install --save-dev skeletonic-stylus
NPM will automatically begin downloading the Skeletonic Stylus Library, the library is lightweight, so even if you are on a slow internet connection it shouldn’t take too much time to download.
Let’s continue by creating an empty HTML file and a folder to store the Skeletonic CSS files. To do so, in Terminal run:
touch index.html && mkdir css
We can now copy all the Skeletonic’s CSS files into our newly created folder
cp node_modules/skeletonic-stylus/css/*.css css/
To get started right away, you can use this HTML starter template. Just copy/paste this code in the index.html file:
<!DOCTYPE html>
<html lang="en" itemscope="" itemtype="http://schema.org/WebPage">

<head>
  <meta charset="UTF-8" />
  <meta name="viewport" content="width=device-width, initial-scale=1.0" />
  <title>Hello, Skeletonic!</title>
  <link href="css/skeletonic.min.css" rel="stylesheet">
  <link href="css/skeletonic-fonts.min.css" rel="stylesheet">
  <link href="css/skeletonic-colors.min.css" rel="stylesheet">
  <link href="css/skeletonic-animations.min.css" rel="stylesheet">
</head>

<body>
  <div id="navigation">
    <input type="checkbox" class="hamburger" id="hamburger" name="hamburger">
    <label title="Open the menu" for="hamburger" class="hamburger-toggle cl-white" aria-hidden="true">
      <span class="hidden" aria-hidden="true">Main menu</span>
      <span class="spinner diagonal part-1"></span>
      <span class="spinner horizontal"></span>
      <span class="spinner diagonal part-2"></span>
    </label>
    <nav id="sidebar">
      <ul class="nav">
        <li><a href="/">Home</a></li>
      </ul>
    </nav>
  </div>
  <main class="container center text-center">
    <h1>Hello, Skeletonic!</h1>
    <p>Welcome to your new app.</p>
    <hr class="hr-text" data-content="Skeletonic">
    <div class="card info padding-1">
      <div class="card-content">
        <h2>How is Skeletonic for you?</h2>
        <p>⭐ We appreciate your star rating and feedback.  If you ever have any questions or concerns, we're here for you. In the meantime, have a great day!</p>
        <button class="primary center">Button</button>
        <button class="secondary center">Button</button>
      </div>
    </div>
    <hr class="hr-text" data-content="Thank you!">
  </main>
</body>

</html>
Publish Your Site
Initial Setup
Install the http-server package from npm
Open a command prompt / command line window and enter the following:
npm install --save-dev http-server
and put in your package.json:
 "scripts": {
  "start": "http-server .",
   "test": "echo \"Error: no test specified\" && exit 1"
 }
Deploy Your Site
In the terminal window, copy and paste the following command to run the app in a local web server from our directory:
npm start
This will build and start the app. Once running you should see the following in your console:
Starting up http-server, serving .
Available on:
  http://127.0.0.1:8080
  http://192.168.86.28:8080
Hit CTRL-C to stop the server
Preview Your Site
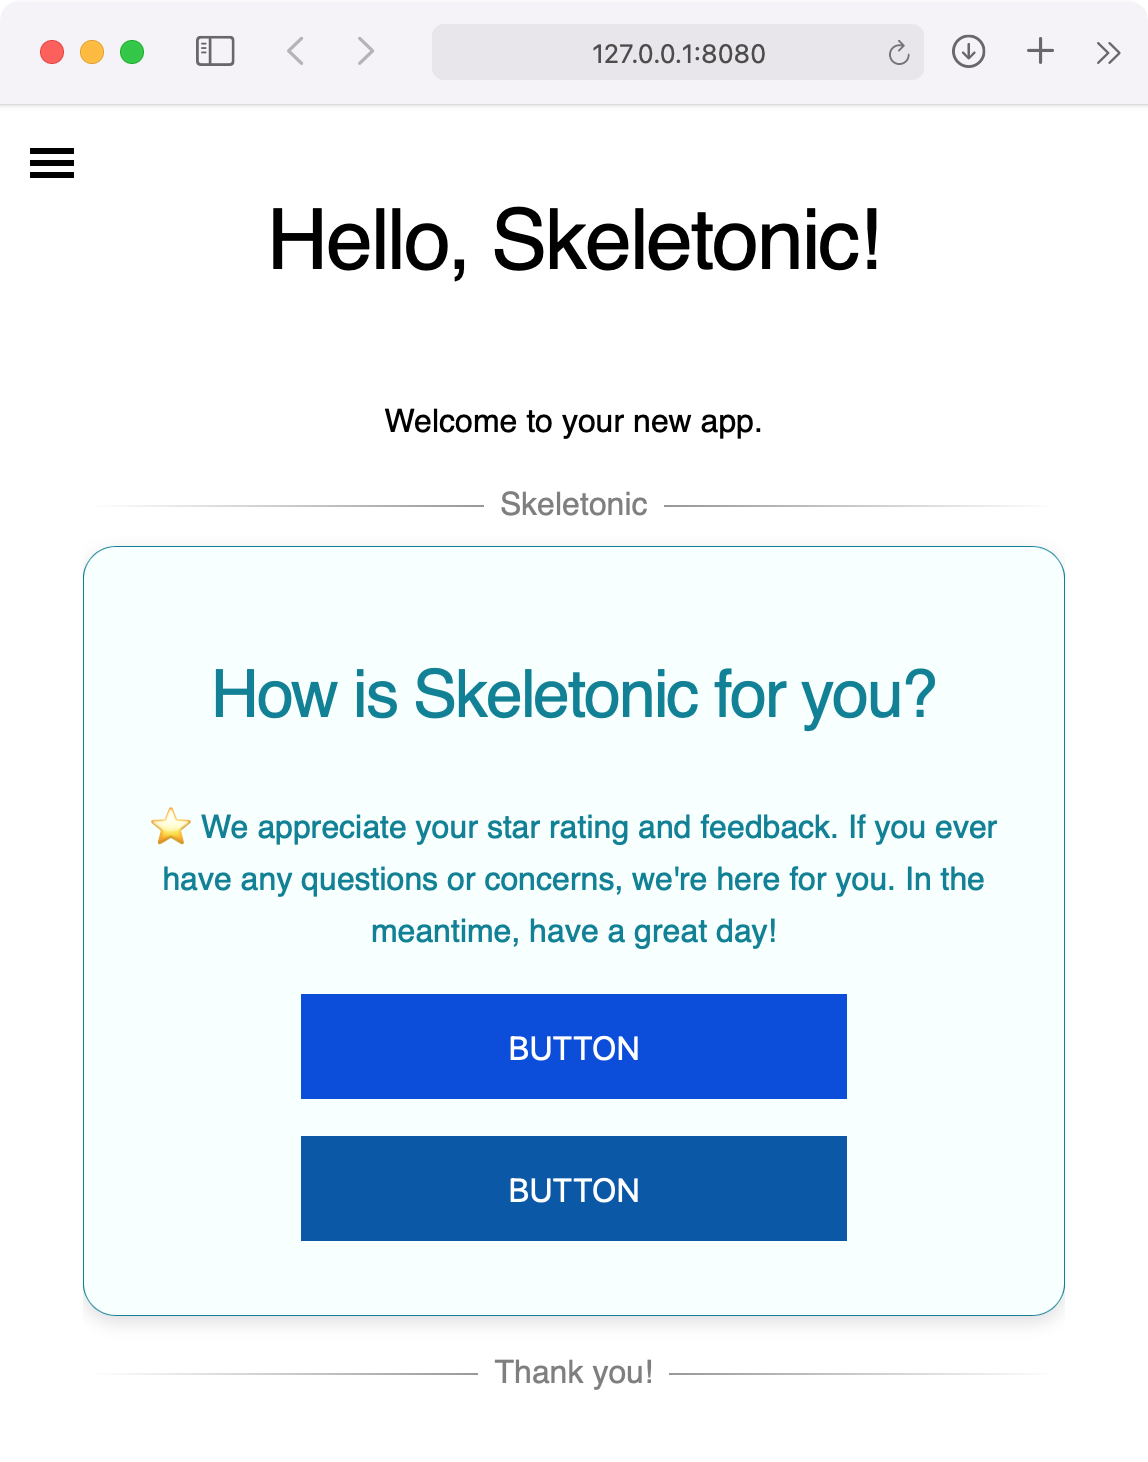
Open your web browser, and visit http://127.0.0.1:8080
You should see the following page:

Congratulations on creating, building, and running your first Skeletonic app! 🎉